- This page covers facts and in-depth game usage of the character, Mary Agent. For a comprehensive reference list of in-game commands, see Command List: Mary Agent.
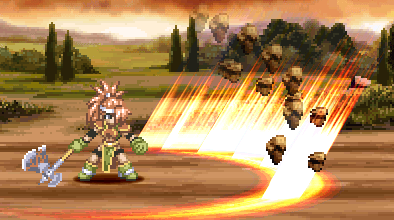
Mary using Retsu Majinken.
Mary Agent (マリー・エージェント Marii Eejento) is one of the main protagonists in Tales of Destiny. Mary is a lens hunter (warriors who kill monsters and sell their lens for money) who had lost her memory. She travels with her money-crazed friend, Rutee Katrea, who got caught in a trap early in the original game. Mary seeked the help of Stan Aileron and rescued Rutee. With the three united by fate, they decided to travel and work together towards fame and fortune as well as looking for clues in curing Mary's amnesia.
Mary wields an axe in battle, and is considered as a powerful melee character. She can only use a few physical artes that is usually themed to earth and wind elements. Her combat abilities are well balanced as well, as she is capable in using her strong physical artes in the ground as well as in mid-air. Her stats are somewhat average except for her power, which is the only above average stat she possesses.
Mary is neither difficult nor easy to use and is recommended for beginner and intermediate players.
Character Facts[]
- Mary has a total of 540 HP.

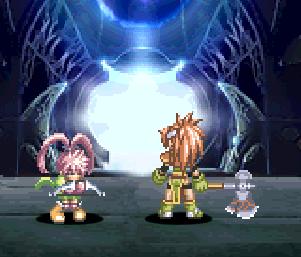
Chelsea and Mary celebrating their victory together.
- She only has one victory pose.
- Her support arte allows her to seek the help of Johnny Shiden and Chelsea Torn from Tales of Destiny.
- If Chelsea deals the final blow, she will also perform her victory pose with Mary.
General Tips & Usage[]
- Mary has average stats (dash length, jump height, move speed) except for her damage output, which is considered average to above average.
- Her defense against Guard Break is considered average to above average.
- Mary receives 30% more damage from Wind Elemental attacks and 20% less damage from Earth Elemental Attacks. (Please refer to this page for more information on ACS Elements).
- Mary can perform all the basic movements in ACS except for High Jump and Backstep.
- Instead of a backstep, Mary will run backwards when ←← is pressed.
- Her Double Jump almost reaches the top of the screen.
- Her Forward Step and Backward Leap has almost the same and has moderate range.
- Mary can chain her backward air dash to a forward air dash.
- Mary has two melee ground attacks (A and B). She also has one melee aerial attacks (A or B).
- Each melee attack costs 1 CC to execute.
- Mary can use her ground melee attacks repeatedly for aas long as she has CC.
- Mary's melee aerial attack can sometimes disable enemies.
- Most of Mary's aerial artes can be canceled by doing a forward air dash just before the arte has been fully executed. This move is known as Dash Cancel.
- The blast from Mary's Overlimit can disable nearby enemies on the ground, preventing her to continue the combo.
- Just like in her original game, Mary uses a Chain Capacity (CC) Gauge, enabling her to use many different artes in her combos as long as she has enough CC to use each arte.
- Mary starts with 10 CC.
- During Overlimit Lv1 or Lv2, Mary's starting CC is set at 13.
- Her chain order consists of:
- Melee > Any Arte Type > Any Arte Type > Any Arte Type > etc.
- Support Artes cannot be used during mid-combo except after using an Overlimit Burst.
- Not all of Mary's artes can be used consecutively.
- If any of her Blast Calibers are used, the combo will immediately end.
Shortcuts[]
| Command | Ground | Air |
|---|---|---|
| F | Overlimit Lv1 | - |
| ← F | Johnny Shiden: Maware Rondo | - |
| → F | Johnny Shiden: Reverb Soul | Moushuuken |
| ↑ F | Chelsea Torn: Hayate | |
| ↓ F | Overlimit Lv2 | - |
Melee Artes[]
- Majinken (Demon Fang) or (Missle Sword)

ACS Mary Agent Arte Exhibition (v.5.505b) COMPLETE
Mary Agent's Arte Exhibition by Kratos1991.
- Moushuuken (Beast Blade)
- Majinken Kai (Power Missle)
- Shittoushuu
- Shunjinrouga
- Shishisenkou (Beast)
- A tackle followed by a release of chi.
- Great knockback effect and disables enemies.
- Has higher chance to cause Guard Break than most of Mary's artes.
- TTS is Fast. TTL is Very Short.
- Gou Majinken (Fierce Demon Fang) or (Fierce Missle)
- Senhoushou (Tornado Blade)
- Houtsuishou (Roaring Havoc)
- A thrust followed by an upward swing which sends the foe flying.
- Moderate knockback effect.
- Hold ↑ to increase the aerial toss and knockback range.
- Hold ← to totally elimintate the aerial toss and knockback effect.
- Can be used with Gou Majinken to create combos that can recover Mary's CC during mid-combo.
- This is no longer possible if the combo counter exceeds 7 hits unless the enemy is against a wall.
- TTS is Fast. TTL is Average.
- Retsu Majinken (Maniacal Fang) or (Ultima Missle)
- Creates a powerful short-ranged shockwave on the ground which cause even rocks to unearth.
- Has higher chance to cause Guard Break than most of Mary's artes.
- Enemies cannot air-tech after this arte.
- Costs TP.
- TTS is Fast. TTL is Average.
- Shishiou Messai

Elemental Melee Artes[]
- Kappa Bakusougeki (Roaring Explosion)
- Gouraiken (Double Blade)
- A cross-slash followed by a lightning strike.
- Has higher chance to cause Guard Break than most of Mary's artes.
- Wind Elemental.
- TTS is Fast. TTL is Short.
- Kagerou (Mirage)
- Shin Gouraiken
- Mary charges her body with a lightning strike and attacks the enemy with a cross-slash followed by another lightning strike.
- Mary cannot be staggered while using this arte (hidden penetrate status).
- Has higher chance to cause Guard Break than most of Mary's artes.
- Wind Elemental.
- TTS is Slow. TTL is Short.
- Bakujinkyousatsu
Support Artes[]
- Maware Rondo
- Reverb Soul
- Hayate (Gale Shot)
Blast Calibers[]
- Shinrabassai
- Mary creates a glyph on the ground and smashes it with her axe, causing a giant earth spike to erupt beneath the enemy.
- Range is 20% of the screen's length
- Has reasonable damage despite its low TP Cost.
- Moderate knockback effect and tosses enemies in mid-air.
- Enemies can air-tech out of this arte.
- TTS is Very Fast. TTL is Short.
- Zan! (Slash!)
- Mary unleashes a barrage of claw-shaped slashes towards her opponents, ending her assault with a swift downward slash.
- Requires Overlimit and Moderate TP.
- Mary's strongest arte.
- Great knockback effect and tosses enemies in mid-air.
- Enemies can air-tech out of this arte.
- TTS is Very Fast. TTL is Short.
Advanced Tips & Combos[]
Battle Strategy[]
Mary is a simple character to use and mostly her strategy is to stay close to the enemy as much as possible. Attacking and counter attacks should be focused more than evasion due to Mary's slightly sluggish movement.
Advanced Tips on Attacking/Staying Close to the Enemy[]
- Attack enemies when their down on the ground, use Mary's Advanced Non-Wall Combo 1 for maximum damage output but be careful of counter attacks and mystic artes.
- Don't create a distance between you and the enemy but instead, try pushing them slowly against a wall using combos. You can slowly kill an enemy to death using Mary's Advanced Wall Combo 1 once this is achieved.
- Mary's Overlimit Lv1 and Lv2 are the same so use Overlimit Lv1 instead when extending combos. Don't forget that enemies on the ground will be disabled when hit with Overlimit so try juggling the enemy first in mid-air using artes like Moushuuken.
- Against melee fighters and blocking enemies, confuse them by incorporating side shifting artes (Shunjinrouga, Shittoushuu) and Guard Breaking artes (Gouraiken, Shishisenkou) in your combos.
- Against long range enemies, try to get closer as much as possible using Shunjinrouga or Kagerou and combo them to death. If they try to knock you back, use Shin Gouraiken's innate hidden penetrate counters to stop their plans. If you still can't get closer to the enemy using the recommended artes above, try disabling them first in mid-range using Gou Majinken.
- Against enemies with penetrate status, use Shinrabassai and make them stagger. After using the mystic arte, the enemy's penetrate buff should disappear.
Advanced Tips on Blocking/Intercept/Evasion[]
- Don't hesitate to use Overlimit Lv1 to cancel an enemy's combo. Mary's Overlimit has no important benefits except for the fact that you have 13 starting CC instead of 10.
- Evade ground based attacks using Senhoushou repeatedly after a double jump to keep Mary afloat.
- Intercept incoming advances using Gou Majinken or Shin Gouraiken and follow up with combos.
General Use Combos[]
Advanced Non-Wall Combo 1[]
- Melee Attack X3 > Houtsuishou (Hold ←) [Note 1] > Gou Majinken > Shunjinrouga [Note 2] > Moushuuken X2 > Retsu Majinken > Shinrabassai
- Quick Input Version:
- A > A > A > ↓ → D + Hold ← > ↓ → C > ↓ ← B > ↓ ← A > ↓ ← A > ↓ → E > ↓ → ← E.
- Requirements and Notes:
- TP for various artes used.
- Note 1: Don't forget to hold ← after the input of Houtsuishou to prevent the enemy from being knocked back. Input the command for Gou Majinken as soon as possible.
- Note 2: Wait for your CC gauge to recover before using Shunjinrouga. The enemy can air-tech at this part but even if they do, they will not be able to block the incoming Shunjinrouga unless they perform a backward air-tech or if your timing is late.
- Some enemies with skinny hotboxes (e.g. Shizel) can evade this combo if your timing or positioning is wrong.
- This combo is a little tricky to use.
- Conrtibuted by Minarie 09:16, July 4, 2011 (UTC)
Advanced Wall Combo 1 (v5.503 and below only)[]
- Melee Attack X4 [Note 1] > Majinken Kai > Gou Majinken [Note 2] > Melee Attack X3 [Note 3]> Majinken Kai X2 > Gou Majinken > Shunjinrouga X2 [Note 4] > Moushuuken > Retsu Majinken > Shinrabassai [Note 5]
- Quick Input Version:
- A > A > A > A > ↓ → B > ↓ → C > A > A > A > ↓ → B > ↓ → B > ↓ → C > ↓ ← B > ↓ ← B > ↓ ← A > ↓ → E > ↓ → ← E
- Requirements and Notes:
- Enemy must be against a wall.
- TP for various artes used.
- Note 1: Before starting the combo, make sure that you're as close to the enemy as you can be.
- Note 2: Use Gou Majinken at the same time as Majinken Kai's shockwave hits the ground. Using Gou Majinken too early or too late would disallow you to continue the combo.
- Note 3: Wait for your CC gauge to recover before attacking.
- Note 4: Wait for your CC gauge to recover before using Shunjinrouga. The enemy can air-tech at this part but even if they do, they will not be able to block the incoming Shunjinrouga unless they perform a backward air-tech or if your timing is late. The 2nd Shunjinrouga allows you to side shift back into position.
- Note 5: You can replace this with Overlimit Lv1 to continue the combo.
- Some enemies with skinny hotboxes (e.g. Shizel) can evade this combo if your timing or positioning is wrong.
- This combo is a little tricky to use.
- Update: No longer works as of v5.505b since the Gou Majinken does not anymore juggle an opponent that's against a wall after 7 hits.
- Minarie 09:51, July 4, 2011 (UTC)
Advanced Wall Combo 2 (v5.503 and below only)[]
- Melee Attack X4 [Note 1] > Majinken Kai > Gou Majinken [Note 2] > Melee Attack X3 [Note 3]> Majinken Kai X2 > Gou Majinken > Shunjinrouga X2 [Note 4] > Moushuuken > Retsu Majinken > Overlimit Lv1 > Maware Rondo [Note 5] > Melee Attack X2 > Retsu Majinken X2 [Note 6] > Melee Attack X2 > Retsu Majinken X3 > Zan!
- Quick Input Version:
- A > A > A > A > ↓ → B > ↓ → C > A > A > A > ↓ → B > ↓ → B > ↓ → C > ↓ ← B > ↓ ← B > ↓ ← A > ↓ → E > F > ← F > A > A > ↓ → E > ↓ → E > A > A > ↓ → E > ↓ → E > ↓ → E > ↓ ← → E
- 60 Hits. Damage is about 4/5 of Kakashi Scarecrow's HP (500).
- Requirements:
Tales of ACS v5.503 Mary Agent Combo 60 Hits
Mary Agent 60 hits combo.
- Enemy is against a wall.
- 80% TP for various artes used.
- Overlimit Bar of atleast Lv1.
- Notes:
- Note 1: Before starting the combo, make sure that you're as close to the enemy as you can be.
- Note 2: Use Gou Majinken at the same time as Majinken Kai's shockwave hits the ground. Using Gou Majinken too early or late would disallow you to continue the combo.
- Note 3: Wait for your CC gauge to recover before attacking.
- Note 4: Wait for your CC gauge to recover before using Shunjinrouga. The enemy can air-tech at this part but even if they do, they will not be able to block the incoming Shunjinrouga unless they perform a backward air-tech or if your timing is late.. The 2nd Shunjinrouga allows you to side shift back into position.
- Note 5: Use Maware Rondo quickly and before the enemy lands on the ground.
- Note 6: After using the 1st Retsu Majinken, Maware Rondo should hit the enemy now. Let your CC gauge recover 1st then use another Retsu Majinken then recover your CC gauge again. Make sure that the 2nd Retsu Majinken is used as the 5th note of Maware Rondo hits the enemy.
- Requirements:
- Mary Agent's highest combo. Pretty difficult to pull off.
- Some enemies with skinny hotboxes (e.g. Shizel) can evade this combo if your timing or positioning is wrong.
- Update: No longer works as of v5.505b since the Gou Majinken does not anymore juggle an opponent that's against a wall after 7 hits.
- Contributed by Minarie 10:07, July 4, 2011 (UTC)

Highest Combo[]
Story Mode[]
Mary has a total of 5 Story Modes, ranging from Easy to Unknown. Note that all modes including and preceding Hard feature opponents that come in "Rounds", meaning that the field, positions, and statistics (HP and otherwise) will reset once an opponent is defeated. Modes after Hard feature opponents that come one after another, meaning that the fields, positions, and statistics of your character will not reset once an opponent has been defeated. However, A portion of your HP is refunded whenever an opponent is defeated in Mania Mode.
Easy[]
Klarth F. Lester
Zelos Wilder
Shing Meteoryte
Dhaos (With Fog, Chat, & Race as an Ally)
Normal[]
Eugene Gallardo
Lyris Aileron
Judith
Shizel
Hard[]
Kohak Hearts
Yuri Lowell
Lion Magnus
Hugo Gilchrist
Mania[]
Shizel
Dhaos (Upon defeat of Shizel)
Hugo Gilchrist (Upon defeat of Dhaos)
Barbatos Goetia (Upon defeat of Hugo Gilchrist)
Unknown[]
Synch & Six God Generals
Hugo Gilchrist (Upon defeat of Synch & Six God Generals)
Shizel (Upon defeat of Hugo Gilchrist)
Dhaos (Upon defeat of Shizel)
Barbatos Goetia (Upon defeat of Dhaos)
Cut-Ins[]
In ACS Mary has one cut-in.
- Tales of Destiny: Director's Cut
")